


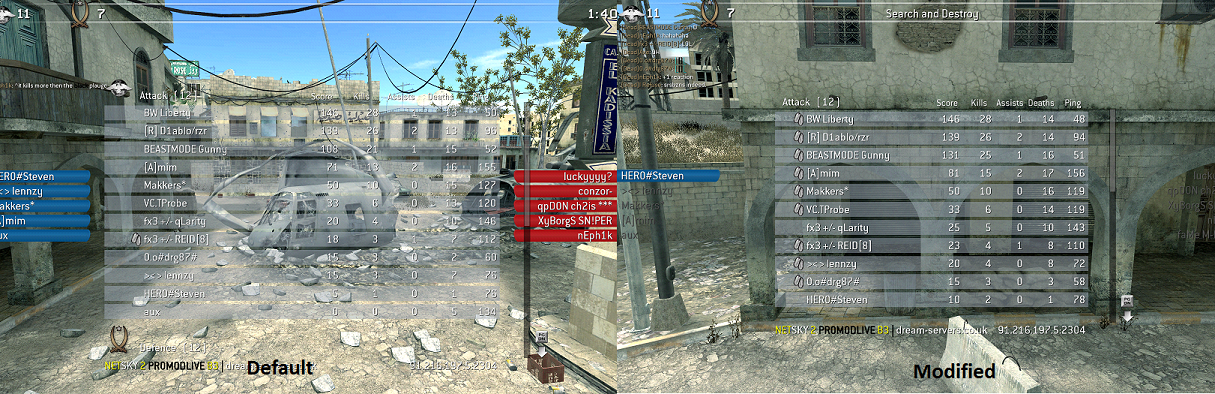
UW-Gaming.de - United Warriors Gaming
1. Tutorial von CFGFactory.com
(englisch für ProMod!!)
This is a tutorial to make your cod4 look, feel and perform how you want it to.
Colours
How to make your config your own by changing colours in the game.
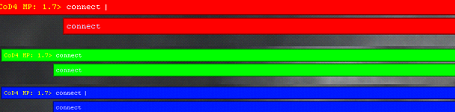
(ui_connectScreenTextGlowColor)
This command will change the colour of the map name in the loading screen you will need to play
with the numbers to get the colour you want. example's (ui_connectScreenTextGlowColor 1 0.1 0.1 1)
is red and (0 1 1 1) is blue and (0 1 0 1) is green

(con_inputBoxColor/con_inputHintBoxColor)
These two commands will change the colour of your console con_inputBoxColor will change
the main console and con_inputHintBoxColor will change the colour of the drop down box in your console colour.
Example's (0 1 0 1) is green, (0 0.1 1 1) is blue, (1 0 0 1) is red, and the same goes with con_inputHintBoxColor
(con_outputWindowColor)
This command will allow you to change the colour of the outputWindow on your console
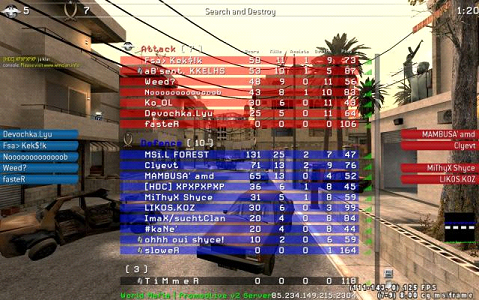
(cg_scoreboardMyColor )
This command will change the colour of your name. play with the number's to get the colour you want for example (0 1 0 0) is green, (1 0 0 0) is red, (1 1 0 0) is yellow and (0 1 1 1) is blue.
![]()
(cg_ScoresPing_BgColor)
This command will change the background colour of the ping graph box. Play about with the numbers
to get the colour you want. Example's (1 0 0 1) is red, (0 1 0 1) is green and (0 0 1 1) is blue.
![]()
(cg_ScoresPing_LowColor/cg_ScoresPing_MedColor/cg_ScoresPing_HighColor)
These commands will change the colour of the ping graph bars. For example lowcolor will be the colour for a good ping, Medcolor will be for reasonable ping and highcolor for a bad ping, (0 1 0 1) is green, (1 0 0 1) is red and (0.8 0.8 0 1) is orange.
![]()
Advance colours
For Advance colours you will need to know the number for the colour you want let's say it's blue which is this (0 0.1 0 1) to get a different shade of the color or a different color all to together you will need to do something like this (0.4 0.1 1 1) which will give you purple.
For a fast easy way to get colour code visithttp://cfgfactory.com/colors/
Colours that will need to be binded to a key
The changes are not "persistent." The effect is lost if the scoreboard refreshes. This is why the following commands will need to be binded.
How the bind should look
bind TAB "+scores;g_teamname_allies ^7Taz!!!^7;g_teamname_axis ^7Taz!!!^7;g_scorescolor_allies 0 0 0 0; g_scorescolor_axis 0 0 0 0; g_scorescolor_free 0 0 0 0;g_teamcolor_allies 0 0.6 1 1; g_teamcolor_axis 1 1 1 1"
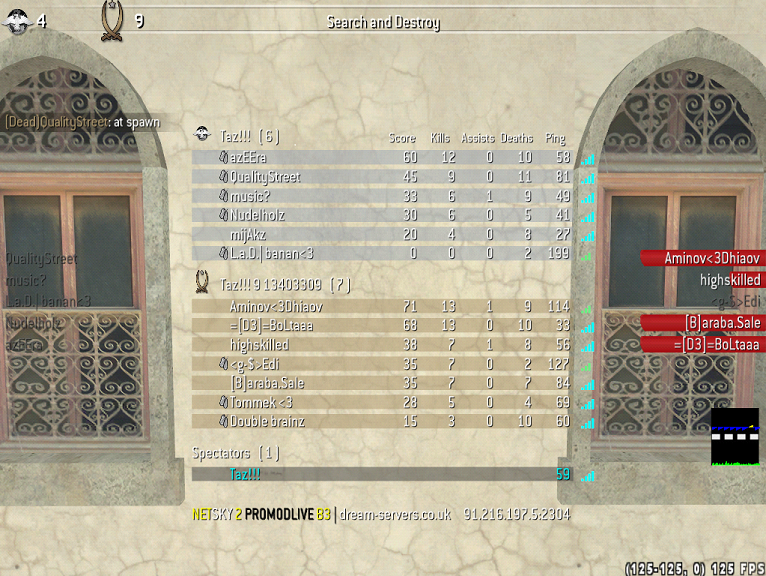
(g_scorescolor_allies/g_scorescolor_axis/g_scorescolor_free)
These commands will change the colour's of your score board. allies=attack side/axis=defence side/g_scorescolor_free is spectator.
(g_teamcolor_allies/g_teamcolor_axis)
These commands will change the colour of the little who killed who notifiction on the bottom left of your screen, Allies=Attack side/Axis=Aefence side.
![]()
(g_teamname_allies ^7Taz!!!^7/g_teamname_axis ^7Taz!!!^)
These commands with allow you to change the colour of your defence and attack names on your scoreboard and allow you to rename it as well, below are all the colours:
^0 = Black
^1 = Red
^2 = Green
^3 = Yellow
^4 = Dark Blue
^5 = Light Blue
^6 = Purple
^7 = White
Things that can be added and moved on the cod4 screen
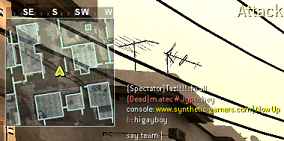
(cg_hudChatPosition/cg_hudSayPosition)
These commands will move the chat box position and the say box positon. Play about with the numbers to move it where you want you will need the set the hight and width. For example, (cg_hudChatPosition 120 120) (cg_hudSayPosition 120 120)
(cg_debugInfoCornerOffset )
This command will allow you to move your fps counter about on your CoD4 screen. For example, you will need to set the hight and width (cg_debugInfoCornerOffset 50 100 )

(cg_scoreboardPingGraph)
This command will draw your ping graph bars up. Example( cg_scoreboardPingGraph 0 ) is ping graph off and (cg_scoreboardPingGraph 1) is ping graph on
![]()
(cg_scoreboardPingText)
This command will draw your ping as text set to (cg_scoreboardPingText 1) for ping text on, and (cg_scoreboardPingText 0) to turn ping text off.
![]()
PS. To have ping graph bars and ping text up you will need to set both of these command to (1) like so.
![]()
(cg_ScoresPing_MaxBars)
This command allow's you to control how many bar's are on your ping gragh it ranges from 1 to 10 bars.
![]()
(cg_scoreboardFont)
This command will allow you to change the font of the name's in your scoreboard. There is 6 different font available.
![]()
(cg_drawfps)
This command will bring you your fps counter. Example (cg_drawfps 1) for fps counter on and (cg_drawfps 0) for fps counter off.
![]()
(cg_drawlagometer)
This command will bring up the lagometer which allows you to visually monitor how smooth your game is running. Example (cg_drawlagometer 1) for on and (cg_drawlagometer 0) is off.

How the lagometer works
Top line
Blue: Frames are being rendered in time with the world updates.your fps. the faster it flows the higher your fps is. you want it to be as thin as possible, the spikier it is due to FPS lag
Yellow: Gameworld updates are not being displayed and are being dropped.lag spikes, mostly due to server lag, or FPS lag.
Bottom line
Green: Packets are being received okay. its your ping. the thinner the less ping you have, it will be like a mountain range, spikes = ping spikes.
Yellow: Capping is causing your client to reject packets.If these are happening something is wrong with your internet (viruses etc) or the server.
Red: The packet's are being lost. This is due to you having a bad connection to the server.
Things that can help fps and the feel of the game
(r_drawdecals)
This command removes all the objects on the detal off ground and walls, for example rubbish and items on the floor. This command can improve FPS even if it is minor
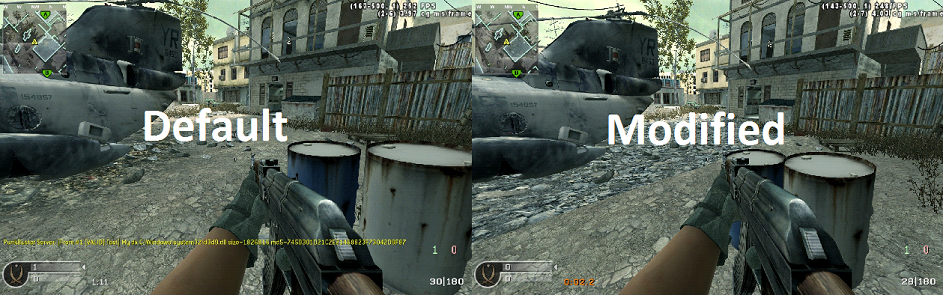
(cg_fov)
This command changes your field of view, ranges from 65 (default) to 80. On Promod Live press B/5/5 to increase field of view even further to give you a maximum on screen view of your surroundings.

(cl_packetdup)
This command controls how many packets are sent to the server, increasing this will send more packets to the server. Usualy when you are going to increase this you have a relatively bad ping. For example 30 ping set to 0, 45-60 ping = 1 etc.
(com_maxfps)
This command allows you to set your fps to what ever you want. It can reduce recoil and will help with jumps, some servers will kick you for over 250fps
(sm_enable)
This command will allow you to turn on or off shadows, can help with fps by as much as 15-30 fps.
(cg_brass)
This command allows you to control whether your gun ejects shells or not.
(r_drawwater)
This command allows you to turn on or off water effects.
(com_hunkmegs)
This command allows you to set the game to use more ram. This can result in faster loading times when loading into maps, and more stable FPS. Set to half of the total ammount of ram inside your pc. Default is 1024.
(r_detail)
This command can either turn camo on or off on all your guns, can give a slight FPS boost.
(fx_marks)
This command will allow you to turn on or off bullet holes on walls. Can give you a small FPS increase.
(sv_clientsidebullets)
This command will allow you to turn on or off bullet effects, by removing the bullet lines and smoke from shooting walls. Can give you a small FPS increase.
(seta r_gpusync)
This command improves your mouse response time of your mouse and keyboard, giving you the maximum performance out of your mouse and keyboard, 0=none - 1=adaptive - 2=agressive. Your probably going to want it on 2.
Thing's you can resize on your cod4
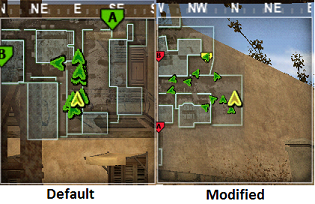
(compassFriendlyHeight/compassFriendlywidth)(compassObjectiveheight/compassObjectiveWidth)
These commands will allow you to resize icons on your minimap.
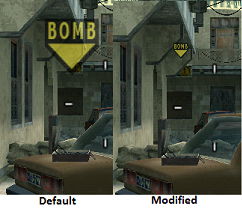
(waypointiconheight/waypointiconwidth)
This command will allow you to resize the bomb icon on your screen
(cg_scoreboardHeaderFontScale)
This command will allow you to set the size of your scoreboard header.
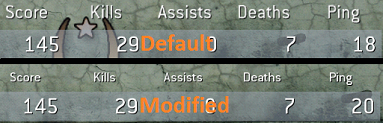
(cg_scoreboardBannerHeight)
This command will allow you to set how high or low you want your score board to sit on your screen.
(cg_scoreboardItemHeight)
This command will allow you to resize the bars on your score board.
(cg_scoreboardHeight/cg_scoreboardWidth)
These commands will allow you to resize your score board.
Here is my confighttp://proconfigs.com/showconfig/433-taz_CoD4_General%20Config.html
Here is my fps confighttp://proconfigs.com/showconfig/435-Taz_CoD4_FPS%20Config.html
PS. please read the read me file when you download any of my configs
Taz's film tweak guide
all of the number values can be set like this 0.1 upto 0.999999 if you go over 6 digits the values will change to 1
How to bind will need to be.
bind F8 "Crash_colors;r_filmtweakbrightness 0;r_filmtweakcontrast 1.25;r_filmtweakdarktint 1.45 1.6 2;r_filmtweakdesaturation 0;r_filmtweakenable 1;r_filmtweaklighttint 1.1 1.35 1.6"
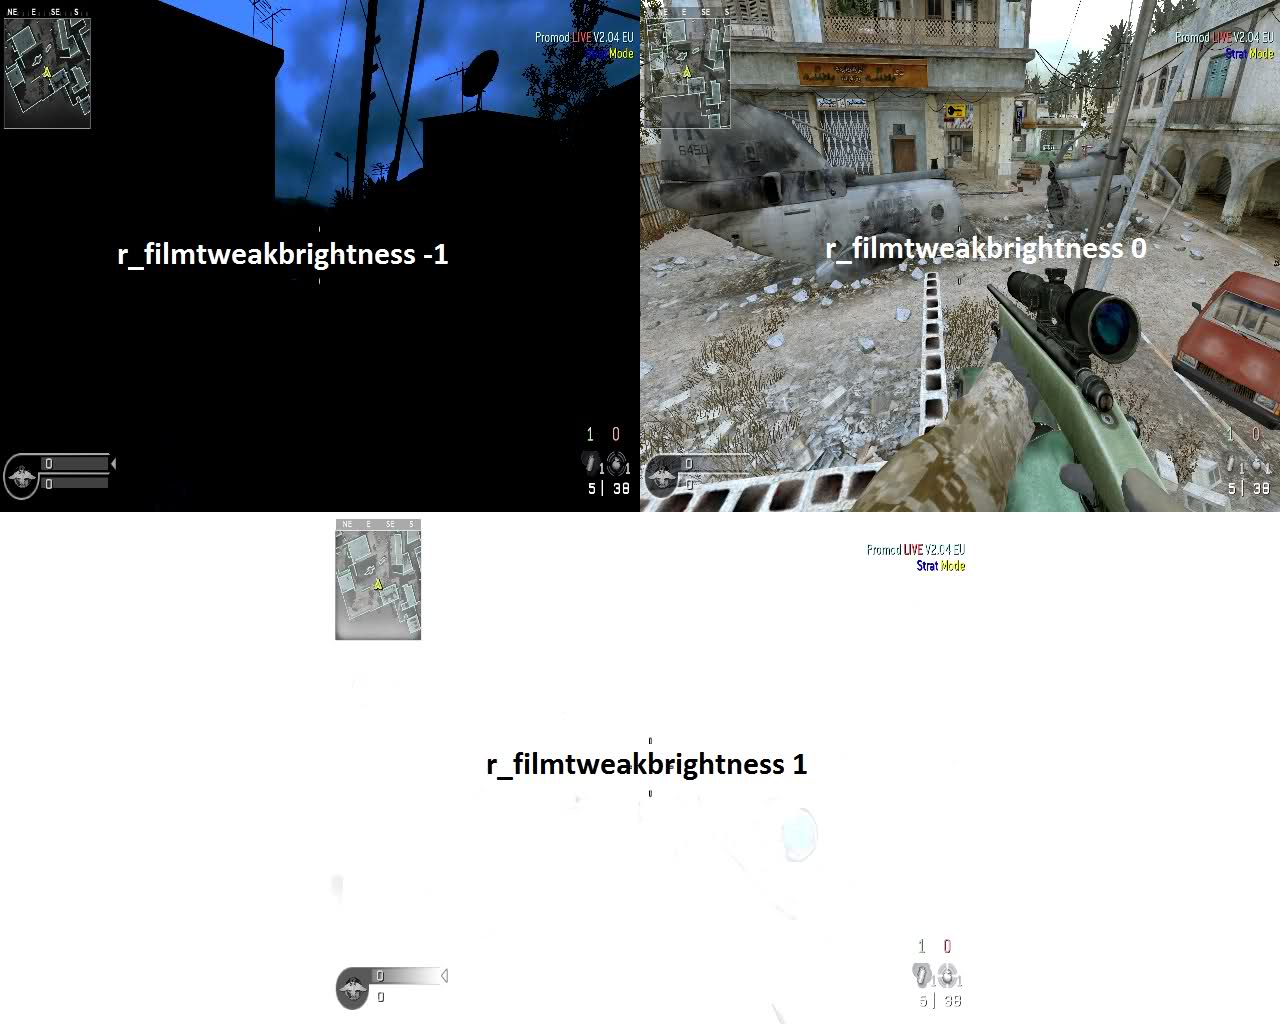
(r_filmtweakbrightness)
This command will allow you to set how bright or dark you want the map to be. values from -1 to 1
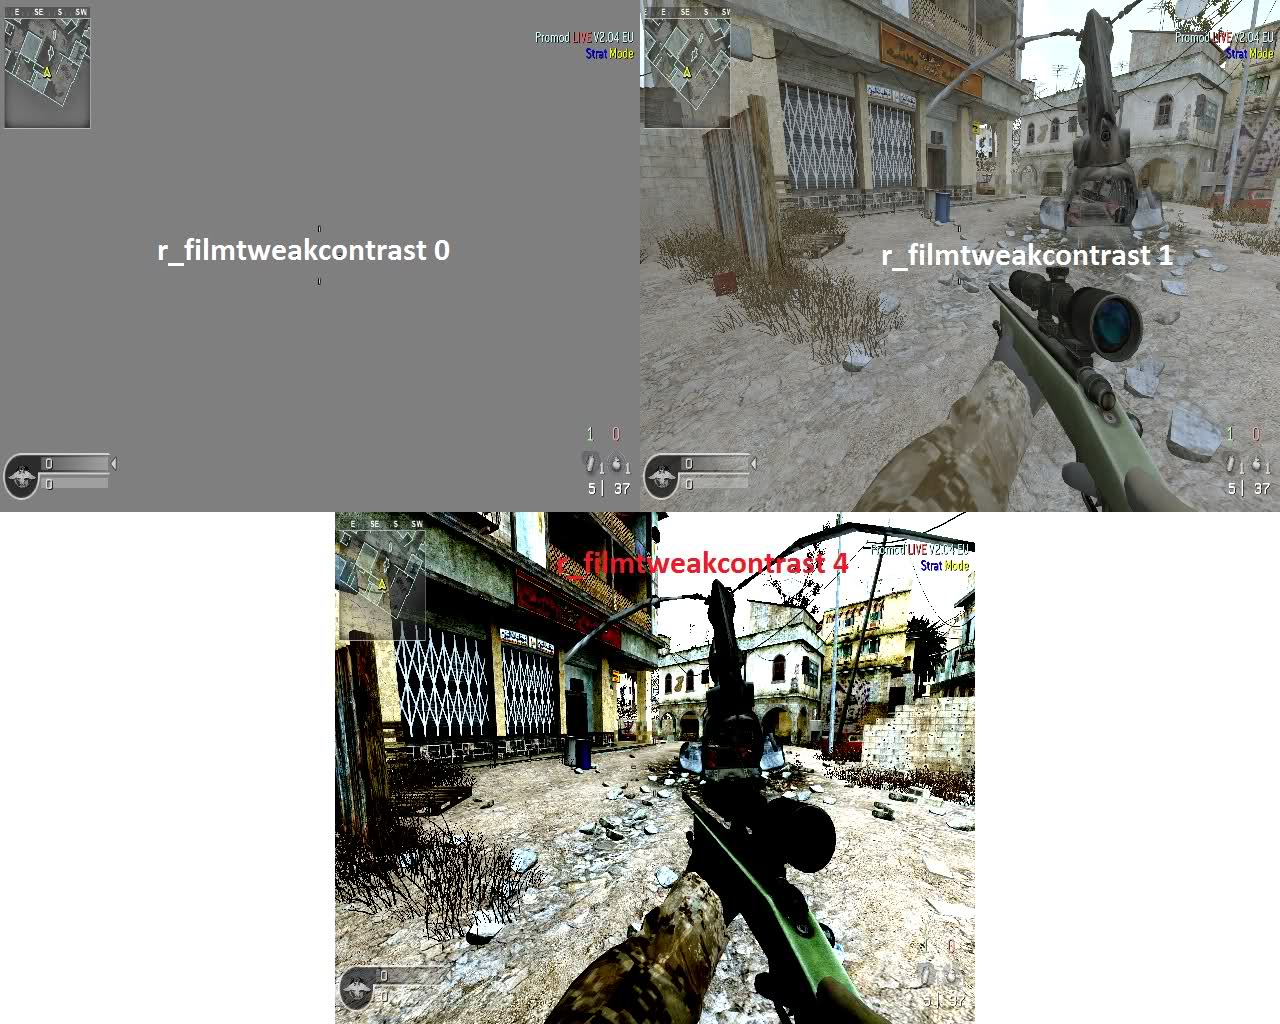
(r_filmtweakcontrast)
This command allows you to change the difference in color and light between parts of the map. values from 0 to 4
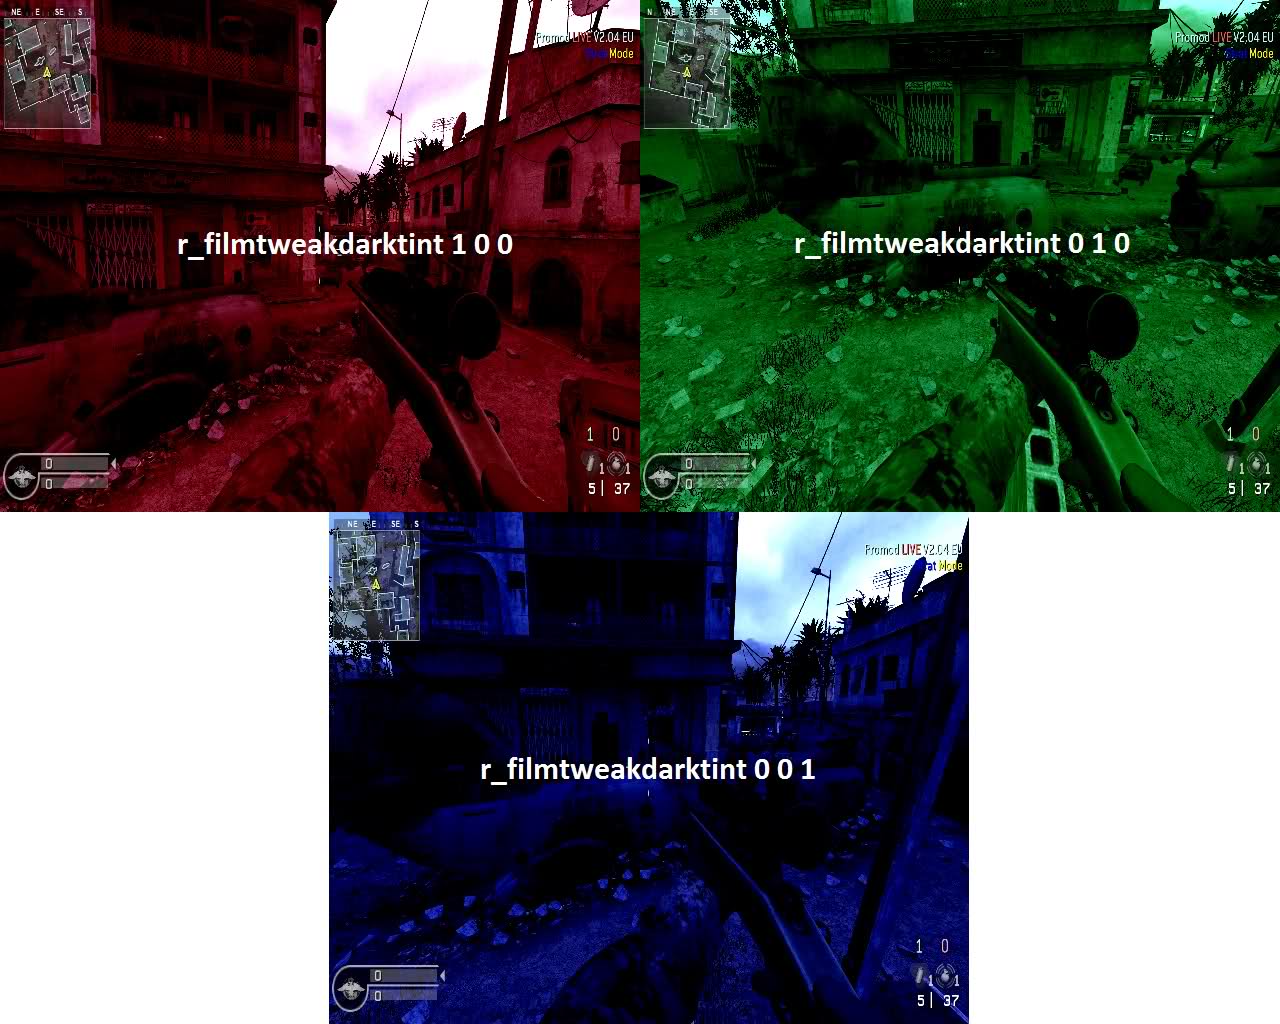
(r_filmtweakdarktint)
This command allows you to control the color tints that will enable you to bring out more vibrant colors on your maps. This command is a 3 number so will look like this r_filmtweakdarktint 0 0 0 values from 0 to 2
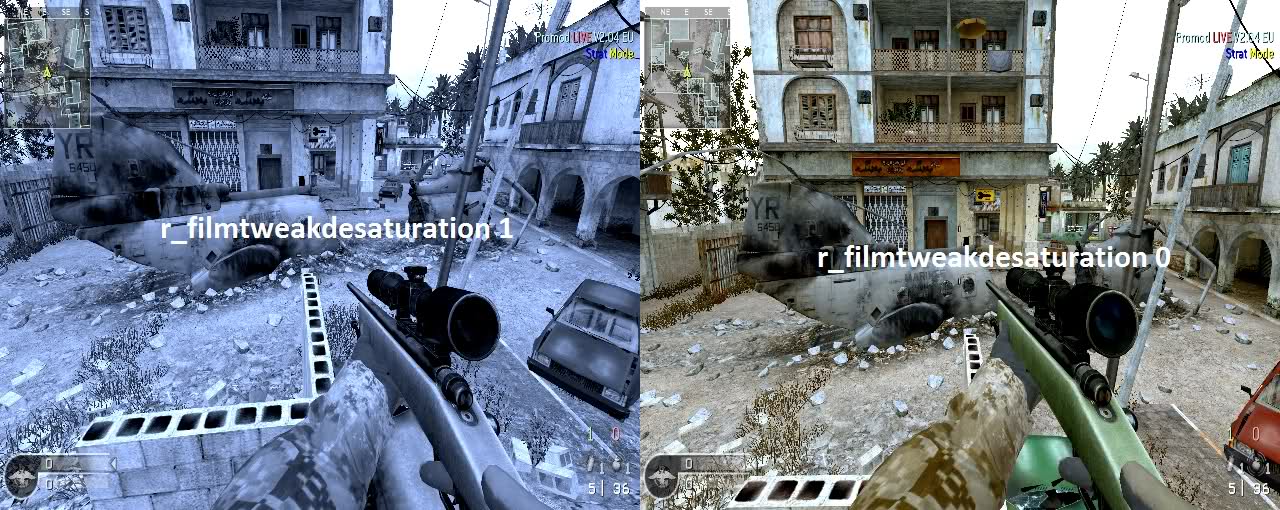
(r_filmtweakdesaturation)
This command will enable you to put like gray/blue tint on a map values from 0 to 1
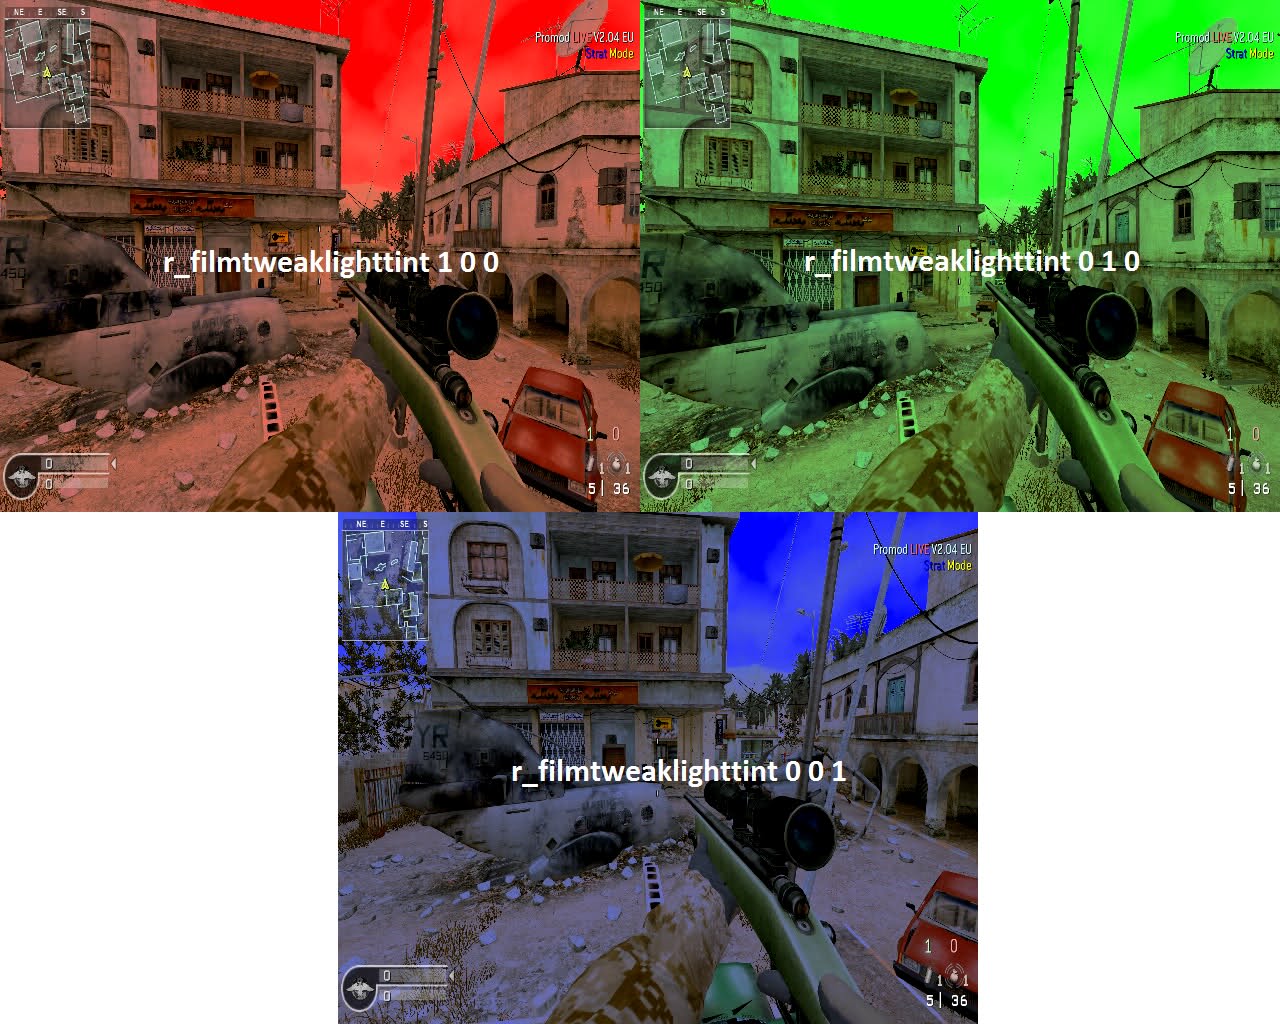
(r_filmtweaklighttint)
This command allows you to control the lighting color tints that bring out more vibrant lighting on your maps. This command is a 3 number so will look like r_filmtweaklighttint 0 0 0 values frome 0 to 2
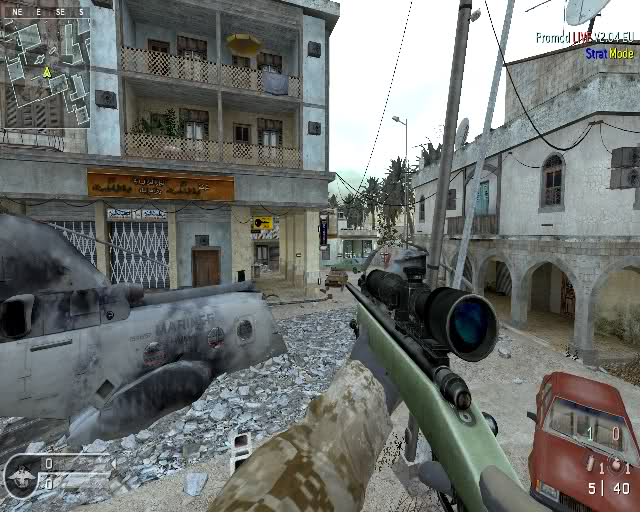
Here is what it can look like when its done
Created by TAZ
Quelle: CFGFactory.com
2. Tutorial von ESL.EU
(deutsch für NORMALE Version)
Wie in vielen Spielen, gibt es auch in Call of Duty 4 eine Konfigurationsdatei, in der alle Einstellungen des Spieles gespeichert werden: Die sogenannte Config oder CFG.
Da man leider in Call of Duty nicht alle relevanten Befehle direkt im Spielmenü eingeben kann, möchten wir die Config hier etwas näher erläutern und die wichtigsten Befehle erklären.
Im Installationsverzeichnis des Spiels (Beispiel: C:SpieleCoD4) befinden sich mehrere Unterordner. Die eigene Config findet man in playersprofileseuer Nickname. In diesem Ordner liegen mindestens 3 Dateien. Die „config.cfg“, welche alle Einstellungen für den Singleplayer beinhaltet; die für uns wichtige „config_mp.cfg“ welche alle Einstellungen für den Multiplayer speichert sowie die mp_data, in der die Ränge für den „Ranked-Online-Modus“ gespeichert werden.
Die Datei „config_mp.cfg“ kann mit einem ganz normalen Textverarbeitungsprogramm geöffnet werden (Beispiel: Editor, WordPad). Gewisse Befehle dürfen in der ESL nur bestimmte Werte haben, andernfalls wird man von Punkbuster gekickt. Welche Befehle das sind und welche Werte erlaubt sind, sind im folgenden Abschnitt aufgelistet.
Alternativ kann übrigens auch jeder Befehl während des Spielens eingetragen werden. Dafür müsst ihr die Konsole mittels ‚[Shift]+^‘ öffnen. Nun könnt ihr alle Befehle mit vorangestelltem ‚/‘ auch direkt im Spiel aktivieren.
/cl_maxpackets
Kommen wir als erstes zu dem Befehl seta cl_maxpackets „60“.
Diese Variable regelt die Anzahl der versandten Packete pro Sekunde. Man kann sich leicht vorstellen, dass Spieler mit einer geringen Bandbreite einen möglichst geringen Wert einstellen sollten, allerdings ist dieser Wert von minimum „60“ auf maximal „100“ begrenzt.
Hintergrund ist, dass Spieler unter „60“ Datenverluste erleiden, was dazu führt dass der Spieler andere oft nicht trifft und er ebenso oft nicht getroffen werden kann, es geht sozusagen „nichts rein“.
Für ESL-Matches muss sich der Wert dieses Befehls zwischen 60 und 100 befinden.
Da der Wert standardmäßig nach der Installation bei „30“ liegt, muss dieser Wert entsprechend angepasst werden.
Es gilt allgemein die Regel: Je höher die maxpackets, desto größer die Datenmenge die mit dem Server abgeglichen werden kann. Demzufolge ist aber auch die benötigte Bandbreite größer.
Um den optimalen Wert der maxpackets zu nutzen, sollte dieser Wert immer ein ganzer Teiler von den Frames Per Second (siehe nächster Absatz) sein.
Bei 100FPS = 100 Maxpackets
Bei 125FPS = 63 Maxpackets
Bei 91FPS = 91 Maxpackets usw.
/com_maxfps
Die FPS (Frames per Second) geben an, wieviele Spielbilder pro Sekunde verarbeitet werden. Dies hat nichts mit der Bildwiederholfrequenz eures Monitors zutun, sondern ist die spielinterne Berechnung.
Mit diesem Befehl können die aktuellen FPS im Spiel angezeigt werden: /cg_drawFPS "1“
Standardmäßig ist hier wieder ein Wert von "91" eingestellt.
Da ein Spielen mit höheren Frames aber deutlich flüssiger läuft, ist es erlaubt die Anzahl der Frames auf maximal 125 zu erhöhen.
Der zuständige Eintrag in der Config dafür ist: seta com_Maxfps „125“.
Da es bei noch höheren FPS zu Bugs in der spielinternen Engine kommen kann, wurde ein Maximalwert für die deutsche Sektion von Call of Duty 4 festgelegt.
Für ESL-Matches muss sich der Wert dieses Befehls zwischen 60 und 125 befinden.
Weitere Befehle
Es gibt noch weitere Anzeigemöglichkeiten außer /cg_drawFPS die uns während des Spieles ein paar Informationen Liefern können.
Beispielsweise das LagoMeter: seta cg_drawLagometer "1", welches uns Informationen über die Internetverbindung zum Server zeigt. Je höher der untere grüne Balken und je mehr „Wellen“, desto schlechter die Verbindung.
Oder der Befehl seta con_minicon "1" welcher den gesammten Ablauf der Console transparent im oberen Bereich des Bildschirms fortwährend anzeigt.
Quelle: ESL.eu